| |
Chapter 8
Finite State Machine Coverage
FSM Coverage
Finite state machine (FSM) coverage deserves special attention given the important role FSMs play in describing the control functionality in many designs. It has been shown in several technical papers and publications how developing tests to increase FSM coverage has detected difficult-to-find bugs. Traditional coverage analysis tools have provided the following FSM metrics:
Design teams often aim for over 95% coverage on these metrics, but it is possible to achieve even 100% state and arc coverage without exercising all the functionality of the FSM. Thus visited state and arc coverage do not necessarily measure the extent to which the functionality of the FSM has been verified. As a result coverage analysis tools have introduced a metrics referred to as FSM sequences or paths to measure a path through a sequence of visited states or arcs.
FSM Path Coverage
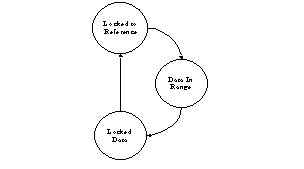
With this new metric comes the difficult task of describing and measuring an FSM path. Consider a simple FSM such as the one shown in Figure 8-1 below.

Looking at the FSM you can see that it has the following functionality:
A series of arcs that traverses every arc in the FSM at least once is known as an arc tour. Completing an arc tour of the FSM would involve the following path of state and arcs through the FSM:
These are the basic paths through the FSM and embody the main functionality of the FSM. There are two arcs missing that are needed to complete the tour; they are the same-state loop in the states Data_In_Range and Locked_to_Data.
Reachability Based Path Extraction
Some coverage analysis tools automatically perform a reachability analysis of the FSM's states. From this analysis they then derive what are known as sequences which are the paths between each state and every other reachable state. Apart from the Reset, in our simple example, every state is reachable from every other state and these tools would generate the following nine different paths.
For this simple FSM there are already nine paths and this analysis has not accounted for the same-state loops on Data_In_Range and Locked_Data.
The reachability analysis does not account for these same-state loops in generating the paths. However, if the analysis does not account for same-state loops the FSM's ability to wait will not have been verified. Since the reachability analysis does not know how many times the same-state loop may have been taken it cannot account for these loops as part of its analysis. So while this automatic method saves you the preparation time it misses the critical same-state loops and increases your analysis effort and time as you filter out the redundant paths and generate paths for the additional important functionality.
Manual Path Specification
Other coverage analysis tools do not provide any automatic methods of path extraction, but they do provide you with a manual way to specify the path using a series of states and some wildcards (*=0+, ?=1+). This increases your preparation time as you identify and specify these paths, however it saves you analysis time. For the above FSM you would need to manually specify the following:
When you have manually specified the paths with wildcards there are fewer paths than were generated automatically by the reachability analysis, but you needed to study the FSM and then manually describe the paths to the coverage tool.
TransEDA's FSM Path Approach
The FSM path coverage metric in TransEDA's VN-Cover Coverage Analysis solution automatically provides a compact, meaningful set of FSM paths enabling deeper insight into a design during verification. TransEDA's unique approach avoids the overwhelming quantity of paths generated by simple reachability analysis and reduces the time required to specify paths manually. VN-Cover's FSM path metric automatically provides a complete representation of a FSM's functionality while minimizing the complexity. This results in shorter analysis time and improved verification productivity. VN-Cover automatically extracts all FSM paths and provides a concise metric that fully represents the FSM paths. Critical in this ability to concisely represent FSM paths and their coverage is to:
The result of this analysis is that it allows you to focus on the FSM's functionality.
Focus On Functionality
By identifying the cyclic behavior, VN-Cover's FSM path metric provides a representation of the design's functionality without you being lost in the details. Three types of paths are then used to describe FSM's functionality:
A link is a directed set of states that does not repeat.
An example would be an initialization sequence.
A cycle is a directed set of states that returns to its starting state without passing through any state more than once.
A supercycle is a longer cycle that identifies the high level functionality and provides a concise summary of the overall structure of the FSM.
Supercycles and cycles allow patterns representing important functionality in the FSM to be automatically recognized. Supercycles report design functionality that is not always apparent to the user when looking at the FSM. Using VN-Cover on the simple FSM example, as shown in Figure 8-1, it would report that there are three supercycles.
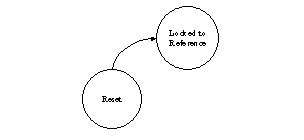
Supercycle 1
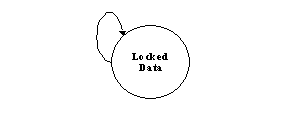
The first supercycle would be the Reset state's same-state loop as shown below.

This represents the functionality of the FSM to wait in Reset until it has Locked to Reference. Once it has then this state is linked to the FSM's main functionality.
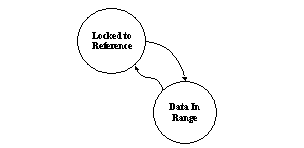
Supercycle 2
The second supercycle, shown below, represents the FSM's main functionality.
This is the FSM's correct operational functionality. It describes that the FSM must first be Locked to Reference, then get Data In Range, and finally Locked Data.
Supercycle 3
The third supercycle, shown below, is the FSM's secondary functionality.
This represents the functionality when an error occurs and the reference is lost. The system has to abandon data acquisition and start over again. This automatic extraction of functionality into supercycles, cycles, and links shortens the analysis time and makes it easier for the designer and verification engineer to develop additional vectors for the unverified functionality resulting in shorter verification effort.
Simplify Complexity
Hanging off these supercycles would be several smaller cycles. These cycles represent a wide range of things. They can be temporal characteristics, corner cases, or border conditions of a supercycle's functionality. For supercycle 2, shown in Figure 8-3, there would be two cycles. The first cycle, as shown in Figure 8-5, would be the same-state loop that would occur while the FSM was in state Data In Range waiting for the data to come into range.
The second cycle, as shown below, would be the same-state loop that would occur while the FSM was in state Locked Data waiting for the data to be locked into the system.
For supercycle 3 shown in Figure 8-4 there would be one cycle. The cycle is in common with Supercycle 2 and is the same-state loop that would occur while the FSM was in state Data In Range waiting for the data to be in range. Functionally, this cycle could be covered by either supercycle as in both cases the path to this cycle is the same: Locking the reference and waiting more than one clock period in the Data In Range state. This shows that the three supercycles:
describe the functionality of the FSM. The only thing that is missing now is the link from Reset to the main functionality of the FSM as shown below.
Including this link will provide you with the complete representation of the state machine:
This new FSM path coverage metric, supported by the concept of links, cycles and supercycles, is a valuable new measure of verification completeness necessary for Coverage Closure.
A Complex Example
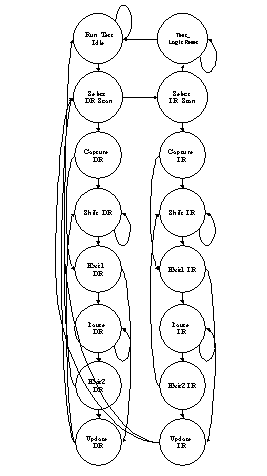
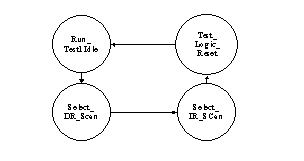
Many people consider the JTAG TAP Controller to be a relatively simple FSM. However, if you look at Figure 8-8 and considered enumerating all of the paths of states and arcs through it you would quickly decide that maybe it is not so simple after all.
Using VN-Cover's FSM Path analysis on the FSM shown in Figure 8-8, detects two simple supercycles that represent the overall functionality of the TAP controller:
The first supercycle is the Run_Test1Idle same-state loop and it represents the important functionality of the FSM to wait in the idle state.
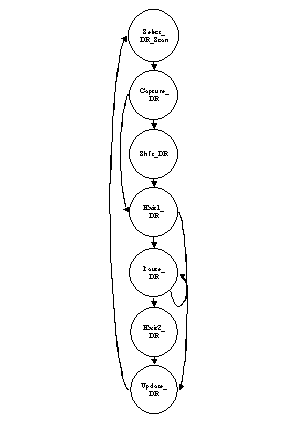
The second supercycle, as shown in Figure 8-9, represents the overall functionality of the FSM, which is to select and scan the Data Register and or select and scan the Instruction Register.
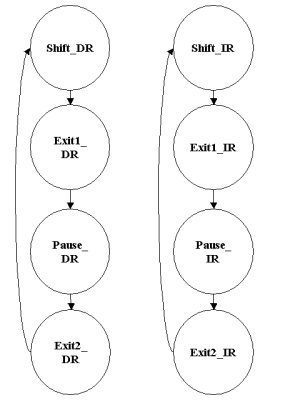
VN-Cover's path analysis also detected the smaller cycles that are the paths through the data and instructions registers:
There were also some smaller same-state loops and two smaller loops one each in the instruction and data register. The full set of cycles are listed in Figure 8-10 at the end of this chapter.
VN-Cover's FSM path analysis resulted in the following:
Taken together these FSM paths clearly describe the functionality of the FSM in easy to understand pieces. This higher level of abstraction provides you with improved verification productivity and shorter analysis time because you can easily understand what is the unverified functionality. If you had used the reachability analysis available from other coverage analysis tools where there would have been a total of 240 FSM paths. Most of these 240 paths would be redundant sequences, but it still would not have included the behavior represented by the same-state loops. You can also contrast this with having to analyze the FSM and then manually write your own sequences.
If you did this you would find that the best that you can create by hand are 25 paths that are almost identical to the ones automatically generated by VN-Cover. You can see a listing of those paths in Figures 8-10 to 8-14 at the end of this chapter.
Conclusion
This chapter has described the importance of FSM path coverage and how TransEDA's FSM path coverage metric provides an automatic and efficient way to see, understand and verify the functionality represented by FSMs. This unique coverage metric provides users with more useful information than is traditionally found in coverage analysis tools, enabling designs to be released sooner and with more confidence.
Appendix-E provides a set of worked examples that show how VN-Cover is used to analyze state, arc and path coverage for a finite state machine.
The following figures and listing show the full set of cycles for the Tap controller as mentioned in the first part of this chapter.
Cycles Automatically Extracted by VN-Cover
Listed below are the cycles that were automatically extracted by VN-Cover.
1. Run_TestIdle-->Select_DR_Scan-->Capture_DR-->Shift_DR-->Exit1_DR-->Pause_DR-->Exit2_DR-->Update_DR
2. Run_TestIdle-->Select_DR_Scan-->Capture_DR-->Shift_DR-->Exit1_DR-->Update_DR
3. Run_TestIdle-->Select_DR_Scan-->Capture_DR-->Exit1_DR-->Pause_DR-->Exit2_DR-->Update_DR
4. Run_TestIdle-->Select_DR_Scan-->Capture_DR-->Exit1_DR-->Update_DR
5. Run_TestIdle-->Select_DR_Scan-->Select_IR_Scan-->Capture_IR-->Shift_IR-->Exit1_IR-->Pause_IR-->Exit2_IR-->Update_IR
6. Run_TestIdle-->Select_DR_Scan-->Select_IR_Scan-->Capture_IR-->Shift_IR-->Exit1_IR-->Update_IR
7. Run_TestIdle-->Select_DR_Scan-->Select_IR_Scan-->Capture_IR-->Exit1_IR-->Pause_IR-->Exit2_IR-->Update_IR
8. Run_TestIdle-->Select_DR_Scan-->Select_IR_Scan-->Capture_IR-->Exit1_IR-->Update_IR
9. Select_DR_Scan-->Capture_DR-->Shift_DR-->Exit1_DR-->Pause_DR-->Exit2_DR-->Update_DR
10. Select_DR_Scan-->Capture_DR-->Shift_DR-->Exit1_DR-->Update_DR
11. Select_DR_Scan-->Capture_DR-->Exit1_DR-->Pause_DR-->Exit2_DR-->Update_DR
12. Select_DR_Scan-->Capture_DR-->Exit1_DR-->Update_DR
13. Select_DR_Scan-->Select_IR_Scan-->Capture_IR-->Shift_IR-->Exit1_IR-->Pause_IR-->Exit2_IR-->Update_IR
14. Select_DR_Scan-->Select_IR_Scan-->Capture_IR-->Shift_IR-->Exit1_IR-->Update_IR
15. Select_DR_Scan-->Select_IR_Scan-->Capture_IR-->Exit1_IR-->Pause_IR-->Exit2_IR-->Update_IR
16. Select_DR_Scan-->Select_IR_Scan-->Capture_IR-->Exit1_IR-->Update_IR
17. Run_TestIdle
18. Pause_DR
19. Shift_DR
20. Pause_IR
21. Shift_IR
22. Exit1_DR-->Pause_DR-->Exit2_DR-->Shift_DR
23. Exit1_IR-->Pause_IR-->Exit2_IR-->Shift_IRFigure 8-11 below shows cycles 1 through 4 for the TAP controller.
If you inspect cycles 5 through 8, in Figure 8-10, you will see that there is a similar set of cycles that to relate to the instruction register rather than the data register.
Figure 8-12 below shows cycles 9 through 12 for the TAP controller.
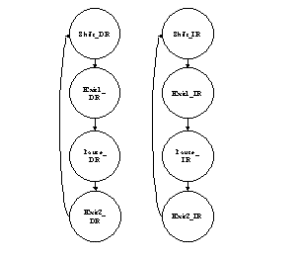
Again, if you inspect cycles 13 through 16, in Figure 8-10, you will see that there is a similar set of cycles as in Figure 8-12 above that relate to the instruction register rather than the data register.
There are also some same-state loops with each of the Supercycles that enable the state machine to wait. Lastly there are two cycles for the backward loop contained in both the data and instruction register.
Manually Created Paths for Tap Controller
If you analyzed the TAP controller manually and then wrote a set of paths to fully represent its functionality the best that you can create by hand are 25 paths. You will notice that the paths shown in Figure 8-14 below are almost identical to the ones automatically generated by VN-Cover in Figure 8-10.
1. Test_Logic_Reset-->Test_Logic_Reset?
2. Test_Logic_Reset-->Run_TestlIdle?-->Select_DR_Scan-->Select_IR_Scan
3. Run_Test1Idle-->Select_DR_Scan-->Capture_DR-->Shift_DR?-->Exit1_DR-->Pause_DR?-->Exit2_DR-->Update_DR-->Run_Test1Idle
4. Run_Test1Idle-->Select_DR_Scan-->Capture_DR-->Shift_DR?-->Exit1_DR-->Update_DR-->Run_Test1Idle
5. Run_Test1Idle-->Select_DR_Scan-->Capture_DR-->Exit1_DR-->Pause_DR?-->Exit2_DR-->Update_DR-->Run_Test1Idle
6. Run_Test1Idle-->Select_DR_Scan-->Capture_DR-->Exit1_DR--> Update_DR-->Run_Test1Idle
7.Run_TestIdle-->Select_DR_Scan-->Select_IR_Scan-->Capture_IR-->Shift_IR?-->Exit1_IR-->Pause_IR?-->Exit2_IR-->Update_IR-->Run_Test1Idle
8. Run_TestIdle-->Select_DR_Scan-->Select_IR_Scan-->Capture_IR-->Shift_IR?-->Exit1_IR-->Update_IR-->Run_Test1Idle
9. Run_TestIdle-->Select_DR_Scan-->Select_IR_Scan-->Capture_IR-->Exit1_IR-->Pause_IR?-->Exit2_IR-->Update_IR-->Run_Test1Idle
10. Run_TestIdle-->Select_DR_Scan-->Select_IR_Scan-->Capture_IR-->Exit1_IR-->Update_IR-->Run_Test1Idle
11. Select_DR_Scan-->Capture_DR-->Shift_DR?-->Exit1_DR-->Pause_DR?-->Exit2_DR-->Update_DR-->Select_DR_Scan
12. Select_DR_Scan-->Capture_DR-->Shift_DR?-->Exit1_DR-->Update_DR-->Select_DR_Scan
13. Select_DR_Scan-->Capture_DR-->Exit1_DR-->Pause_DR?-->Exit2_DR-->Update_DR-->Select_DR_Scan
14. Select_DR_Scan-->Capture_DR-->Exit1_DR-->Update_DR-->Select_DR_Scan
15. Select_DR_Scan-->Select_IR_Scan-->Capture_IR-->Shift_IR?-->Exit1_IR-->Pause_IR?-->Exit2_IR-->Update_IR-->Select_DR_Scan
16. Select_DR_Scan-->Select_IR_Scan-->Capture_IR-->Shift_IR?-->Exit1_IR-->Update_IR-->Select_DR_Scan
17. Select_DR_Scan-->Select_IR_Scan-->Capture_IR-->Exit1_IR-->Pause_IR?-->Exit2_IR-->Update_IR-->Select_DR_Scan
18. Select_DR_Scan-->Select_IR_Scan-->Capture_IR-->Exit1_IR-->Update_IR-->Select_DR_Scan
19. Run_TestIdle.Run_TestIdle?
20. Pause_DR.Pause_DR?
21. Shift_DR.Shift_DR?
22. Pause_IR.Pause_IR?
23. Shift_IR.Shift_IR?
24. Exit1_DR-->Pause_DR?-->Exit2_DR-->Shift_DR?
|
|
|